Call Button General Settings |

|

|
|
Call Button General Settings |
|
|
Call Button General Settings |
|
|
|
Call Button General Settings |
|
|
|
|
||
Clicking the General tab gives you these options:
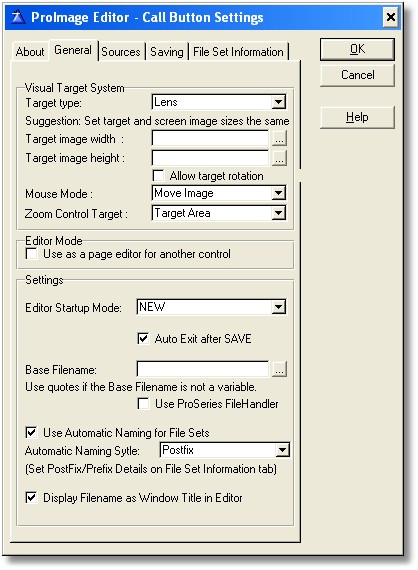
The Visual Target System is one of the most powerful features of the ProImage editor since it provides real time feedback to the user about the area of the image that will be captured when they click the save button.
Target Type
Two types of target are available.
●Wireframe - a dashed line indicator is drawn on top of the image
●Lens - a semi-transparent colored block is drawn on top of the image
●None - no indicator is displayed
Note: If the user loads a image smaller than the target size, the editor will warn the user and turn off the target system. The user may then load a larger image and turn the target system back on. If they process a image smaller than the target, then the image will be returned at its full size.
Target Image Width
The width of the target indicator in pixels.
Target Image Height
The height of the target indicator in pixels.
Allow Target Rotation
Depending on what type of images you are capturing, you may or may not want to allow the user to rotate the target indicator. If the target size is landscape orientation (example: 400x300) and the user loads a portrait orientation image, then you may want to allow them to rotate the target indicator.
If this feature is enabled in the template then this button will display in the viewer:

If this feature is disabled in the template then the button will be automatically hidden at runtime.
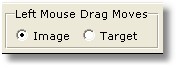
Mouse Mode
The mouse mode controls what happens when the user holds down the left mouse button and drags over the viewer area.
●Image - the image is moved behind the visual target indicator
●Target - the visual target indicator is moved over the image
The template option sets the default mode for the mouse mode. The user controls this selection with this radio option:
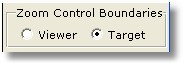
Zoom Control Target
The Zoom Control Target allows the user to change what boundaries are used when they click the Zoom to Fit, Zoom to Fill, Zoom to Width and Zoom to Height buttons.
If the viewer is selected - the zoom actions use the viewer as the boundary. If the target is selected - the zoom actions use the target as the boundary. The selection is presented to the user in the editor with this radio control option:
Editor Mode
If the option to use ProImage as a page editor for another control is selected then certain options (such as saving and the file set information) are disabled since they do not apply.
The page editor mode assumes you are passing an image to and from the ProImage editor from another control.
Note: If the page editor mode is enabled - the "Settings" block at the bottom is disabled as it does not apply.
Editor Startup Mode
ProImage makes it easy for you to control how the editor behaves. This includes setting certain types of actions to make the editor more user friendly for your application. Some of the modes (such as SCANNER) simulate actions (like selecting the load from scanner option) as soon as the editor is loaded.
The Editor Startup Modes are:
●NEW - when the editor is loaded, a new session is assumed and the user is ready to originate a new image
●EDIT - when the editor is loaded and a filename (as specified in the base filename) exists, the file is automatically loaded
●MENU - presents the user with a popup menu for the ProScan/ProImage interface
●MULTI - sets the editor up for working as a multiple file processing editor. No data is sent to or received from the editor.
●CAMERA - when the editor is loaded, it immediately presents the user with the load from camera dialog
●MEDIA - when the editor is loaded, it immediately presents the user with the load from media reader dialog
●CLIPBOARD - when the editor is loaded, a image on the Windows Clipboard is immediately loaded
●SCANNER - when the editor is loaded, it immediately initiates a scan (or presents the dialog to setup a scanner if needed)
●INTERNET - when the editor is loaded, it immediately presents the user with the load from Internet dialog
●WEBCAM - when the editor is loaded, it immediately presents the user with the load from Webcam dialog (or presents the dialog to setup a Webcam if needed)
●TIFF- when the editor is loaded, it immediately presents the user with the load from TIFF dialog
●FAX - when the editor is loaded, it immediately presents the user with the load from FAX TIFF dialog
Auto-Exit After Save
This option closes the editor window as soon as the user clicks the save button and a save has been completed.
Base Filename
The base filename is a variable that holds the filename (use quotes if it is a fixed name) for the file to be loaded or saved.
Automatic Naming Style
When creating file sets (example: Thumbnail, Screen Image and Print Quality Image) from the same selection, ProImage can do automatic file name mangling using either a postfix or prefix. This is an action where the base filename has characters added before or after it to identify which part of the image set it is - without losing the identity of the original image.
Example: Base filename is MyPhoto.jpg
Name mangling with a Postfix might create this set of photos:
Thumbnail: MyPhoto_T.jpg
Screen File: MyPhoto_S.jpg
Print File: MyPhoto_P.jpg
Name mangling with a Prefix might create this set of photos:
Thumbnail: T_MyPhoto.jpg
Screen File: S_MyPhoto.jpg
Print File: P_MyPhoto.jpg
The default mode is Postfix.
When using postfix name mangling is that the files group together by file name.
When using prefix name mangling is that the files group together by file type.
Display Filename as Window Title in Editor
When this option is selected the name and path of the file being edited is displayed as the title of the editor window.