Quick Start |

|

|
|
Quick Start |
|
|
Quick Start |
|
|
|
Quick Start |
|
|
Adding ProArchive functionality to your application involves these steps:
1. Install the template
Install the ProArchive template for your version of Clarion.
Click here for details.
2. Add Archive Aliases to your dictionary
You must add a new "Archive" alias to your dictionary for each file that you want to use with ProArchive.
Click here for details.
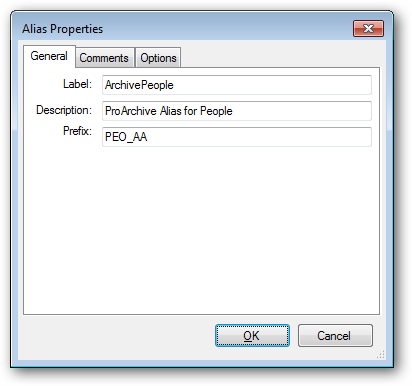
In the Alias Properties, enter the Label and Prefix for the alias file. You may also want to add a meaningful description.
NOTE: We suggest that the Label for the Archive Alias file be the word "Archive", followed by the name of the file.
This will group all of your Archive Alias files together in the template pick lists and it will make it easy for you to distinguish the Archive Alias files from other aliases in your dictionary.
You may also want to change the prefix of the Archive Alias file to be the regular file prefix, followed by an underscore and the letters AA.
Example:
File: People
File Prefix: PEO
Archive Alias: ArchivePeople
Alias Prefix: PEO_AA
Repeat this for each file in your dictionary that you want to use with ProArchive.
3. Add the ProArchive global extension to your application
Click here for details on adding the global extension.
NOTE: On Multi-DLL applications, you only setup the ProArchive file relationships in the Data DLL.
Click here for details on using ProArchive with Multi-DLL applications.
4. Configure the global extension template
Use the global extension template to tell ProArchive what type of application it is installed in and how the data paths to the archive files are managed.
You also configure the relationships between the regular data files and the Archive Alias files.
Click here for details on configuring the global template extension.
5. Add and configure the BrowseShare extension template
To share a browse between the active data files and the archive file, add and configure the BrowseShare extension template to the procedure. You can also enable archiving and add a Button Control that will archive the current selected record in the browse. There is also a Button Control that you can add to toggle between viewing the active and the archive file.
Click here for details on configuring and using the BrowseShare extension.
6. Add and configure the ReportShare extension template
To share a report between the active data files and the archive file, add and configure the ReportShare extension template to the procedure.
Click here for details on configuring and using the ReportShare extension.
7. Add and configure the ArchiveProcess extension template
To use a process template to archive multiple records, add and configure the ArchiveProcess extension template to the procedure.
Click here for details on configuring and using the ArchiveProcess extension.